In June 2016, Google announced that it was shaking up the way users add Google Maps to their website. Going forward, new users will need a Google Maps API key.
That means, for the time being at least, existing Google Maps users are unaffected – the maps currently being displayed on your website will continue to function. How long it will continue to work is anyone’s guess. My advice is to be prepared for changes, and grab yourself a Google Maps API key now.
If you’re looking to add a new map to your website, the choice is taken out of your hands – you need that API Key or no maps.
In today’s post, I’m going to walk you through the steps required to acquire a Google Maps API key, then add Google Maps to a Divi-powered website.
Obtaining a Google Maps API Key
Now, there are a number of APIs supported by Google Developers. The one you need if you want to display maps is the Google Maps JavaScript API key.
A quick word of warning: Google Maps JavaScript API is split into two plans –Standard and Premium. Most of you will want to opt for the Standard plan. It gives you free access up to 25,000 map loads per day. Beyond this, you must pay $0.50 per 1,000 additional views, up to 100,000 views per day. (If you’re lucky enough to generate traffic that exceeds these limits, you can learn more about the Premium plan by clicking here.)
With that out of the way, let’s get started and add some maps to our websites.
The first step is to acquire the Google Maps API key. Before you can do any of this, you need a Google account – you can set one up free by clicking here. However, I’m going to assume that most of you have a Google account already, so let’s skip to the next step.
When you’re logged into Google, make your way to the Google Maps Javascript API page – link here.
Scroll down the page, then click the big, blue Get a Key button.

This will open a lightbox. At the top, you’ll be able to give your project a name. To proceed, you must agree with Google’s terms of service, then click Create and Enable API.

After a few seconds wait, Google will have generated your Google Maps API key. Make sure you copy this and store it somewhere safe for later use.
Protecting the Google Maps API Key
So far, so good. The next step is to improve the security of your new app. This means clicking the Go to Console button directly below your API key. This opens up a new window.

On this screen, you can restrict the use of your API to your website only. This means that no unauthorized user can get hold of your API key then use it on their own website, thus eating into your daily map load allowance – and, potentially, costing you a lot of money if you have billing enabled.
Fortunately, this is really easy to do, too. On the window that Google has just opened up for you, find the Key restriction section.

If you just want to display maps on your WordPress website, select the HTTP referrers (web sites) option.
This will open up a new field for you to add your domain/s. Be sure to add them in the required format: *.example.com/*

The asterisks, slashes, and periods need to be formatted exactly like this. If you want to add multiple domains, you can add them one line at a time.
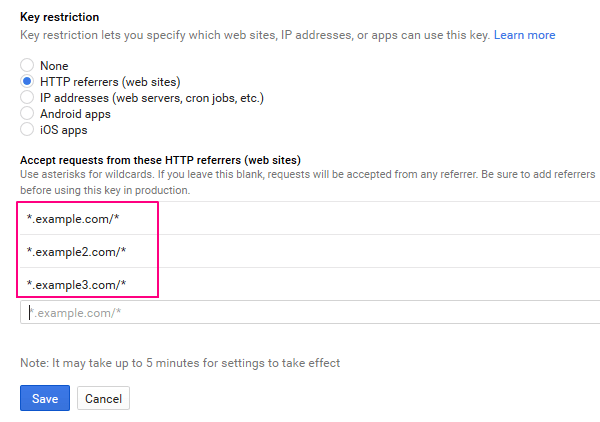
When you’re finished, hit the Save button. You now have to wait for a few minutes for the changes to be implemented, then you’re free to use your newly created API key to add Google Maps to your website.
Add Maps to Your Divi Website with Google Maps API Key
Now it’s time for the fun bit – adding the maps to your site. And, for Divi users, this task is super-easy – or click here if you’d like to peruse a collection of the best Google Maps plugins.
All you need to do is navigate to Divi > Theme Options. In the General tab, scroll down to the Google Maps API field. In the space provided, go ahead and paste in your Google Maps API key, then hit Save Changes.
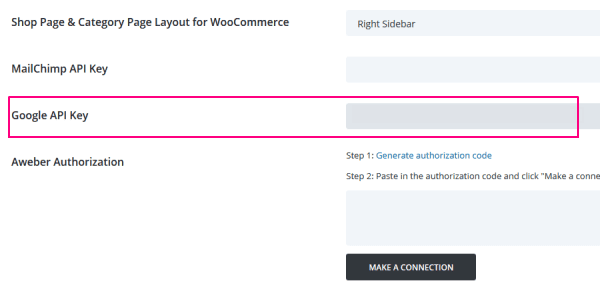
You’ll then see a green tick icon, showing that your API key has been accepted. Now you’re ready to add Google Maps to your site.
Divi Builder Maps Module
I won’t go into too much detail here, but let me quickly show you how to add maps to a Divi website. To start, open up the WordPress visual editor – Posts > Add New – then click on the Use The Divi Builder button.

Next, insert a column or row, then click to Insert Modules.

From the list of modules, select Map.

Now you can begin to configure your maps. Start by specifying the center point for the map, then you can drop an unlimited number of pins onto your map by pressing theNew Pin button. You’ll be asked to specify a physical location for each pin.

With Divi maps, when a visitor hovers over a pin, it opens up a small infobox providing more details. You can, of course, populate this yourself with content relating to the location.
The Divi Map module supports a slimmed down version of the WordPress visual editor, which you can use to write the pin’s content. You can also select an image from your media library to attach to the pin.

When you’re done with a particular pin, just hit Save. This takes you back to the main map screen, where you’ll find a few more settings for you to configure. These include activating mouse wheel zoom and whether you want to disable the maps on smaller devices.
When you’re all finished, don’t forget to hit Save & Exit.
Now when you publish your post – voila! You have yourself a great-looking map!

Last thing…
Although the changes applied to Google Maps might have inconvenienced some users, hopefully, this short tutorial shows you just how easy it is to comply with Google’s new rules and create yourself a Google Maps API key. Divi users can paste this API key into the settings screen seamlessly, so you can start adding maps in just seconds.
Source: Elegant Themes Blog
